 |||
|||

VDI minus the I? Not quite, but could almost be.Depending our your desktop workload, AWS WorkSpaces could be a viable virtual desktop environment. Amazon WorkSpaces is a “managed desktop computing service in the cloud”.
In it’s simplest form, it’s a Microsoft Windows desktop that a user can log in to and be able to share resources with others in your “directory”. Whether that is your Active Directory on premise in your data center, in EC2, or an AWS Simple AD managed Samba 4 Active Directory compatible server.
No, they aren’t Windows 7 desktops. Close enough most non IT users wouldn’t be able to tell the difference. As most of you that are familiar with Microsoft licensing know, it would be a lot more money in licensing to give Win 7. Than say, desktops that are 2008 R2 Data Center Edition desktops. Which is what WorkSpaces are and that’s OK.
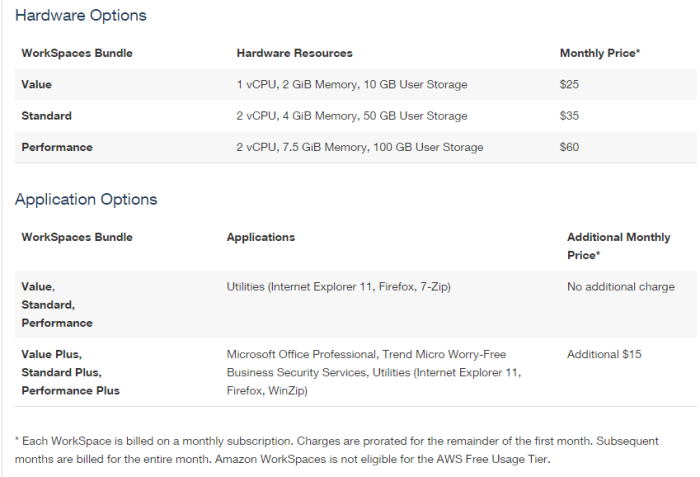
Currently, you can’t spin up a 16 vCPU 64GiB memory WorkSpace. For that you need to look at EC2. For WorkSpaces, AWS offers three tiers or bundles.
Currently, the Value bundle is 1 vCPU, 2GiB memory, 10 GB User Storage for 25$. The Standard Bundle is 2vCPU, 4 GiB memory, 50 GB user storage for 35$. The last bundle is the Performance with 2 vCPU, 7.5 GiB memory, 100 GB user storage for 60$.(prices for current US East(N. VA)). Note: There is no free tier for WorkSpaces. They’re a charged monthly.
Add an additional 15$ to any of the bundles to make it a Plus bundle with your choice of Microsoft Office Professional 2010 or 2013.
They couldn’t have made it more intuitive to launch a WorkSpace. For a company that has the most granular billing, that the details actually get lost in the details, they’ve done a great job in simplifying the creation and management of the images, bundles, and users.
Once you click the Launch WorkSpace button, you select what directory the WorkSpace will be launched. Next search for and select your user. Finally, select the bundle. Either a custom one or one of the six prebuilt bundles. It’s that easy.
Starting off, there won’t be any custom images. Select your initial bundle choice, and click launch. It can take up to 20 minutes for the WorkSpace to be available. At first, that length of time seemed long to me. But if you take in to account the entire process, it is bringing up a virtual machine, joining the domain, rebooting.
I have noticed that the VM is ready on the back end via Remote Desktop Protocol (RDP) much sooner than it shows available on the WorkSpaces console or to the WorkSpaces client. My guess is that there is some validation going on before it is presented.
After the desktop is up you may load almost any application you need. I had an issue with an ISO mounter program. WorkSpaces didn’t like the virtual drive. The desktop ran fine but when attempting to create an image it errored out with the virtual drive as the cause.
After the applications are installed and the desktop is configured for your users, select the WorkSpace from the console and Create Image. The imaging process takes time to go grab a Scooby snack.
Once your images are created, you need to create a bundle. This bundle defines what initial image the WorkSpace has and the hardware bundle option.
Deploying WorkSpaces for users is as simple as the initial WorkSpace launch above. Just select your custom bundle instead of the prepackaged bundles.
WorkSpaces are region specific and have no native inter regional fail over strategy. The snapshot interval on user data is currently every 12 hours and not configurable.
There are also application streaming capabilities. I have yet to test that process. As far as speed all three bundles were surprisingly responsive.
It’s a viable virtual desktop environment option in my opinion and deserves a look. If you’re looking to deploy a virtual desktop to your users, it doesn’t get much simpler. Until my next post.